This blog helps you to create a WordPress-Multisite instance and mapping it to two different domains. For example, the first site will be example.com and the secondsite will be newsite.com, here both the sites has two different top-level domain names.
Prerequisites :
- An AWS account to launch lightsail server.
- Access to any Domain Hosting Provider to create A records.
Creating WordPress-Multisiste instance :

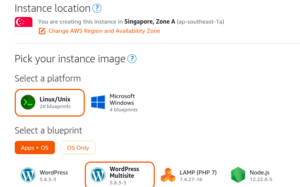
- Select the availability zone you where you need to have your instance.
- Select instance image, hee am selecting Linux/Unix as my instance image.
- Then select WordPress Multisite under under Apps+OS.
- Choose instance plan which you are comfortable.
- Under identify your instance you can give any name to your instance.
- Then click on Create instance.
Connecting to your instance:
Lets connect to our instance and get the dashboard login credentials.
- Click Connect using SSH under Connect which will open a terminal in browser.
(NOTE : while trying to connect the terminal you may get an connection refused error please try after 2-3 minutes after the instance has been launched. - Now after connecting the instance type ls which will list the files in the directory like below,

- Now run the following command to know our password cat bitnami_application_password which will give the password for our wordpress login and the Username will be user by default that we can change in dashboard if needed.
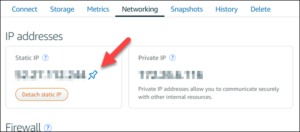
- Now copy the Static-IP address and paste it in any browser URL bar which will take to your website and then add wp-admin at the end of the URL to go to the login page of your wordpress as below
http://youripaddress/wp-admin - Now use the username as user and paste the password you copied from the server.
Now, we logged-in in our WordPress – Multisite dashboard.
Creating Multiple sites and Mapping it to two different domains:
Defining Primary Domain – We need to first define our primary domain for our main website. To define a primary domain go to your lightsail page and connect to the server by clicking Connect using SSH and run the following command using your domain which you need to be your primary domain.
sudo /opt/bitnami/configure_app_domain –domain yourdomain.com
Adding A record in the DNS settings for our primary domain
After defining our primary domain we have to set A record to it as following
- Go to your DNS hosting provider for eexample here we using Godaddy as our domain hosting.
- Navigate to your domain and search for Manage DNS / Manage Domain and click on that.
- Now you can see DNS Records section, here
- click > Add Record > select type as A record > add your primary domain name in Name feild > your ip address of the lightsail server in the Value feild > click Add
- Now check your domain name in any browser which should serve the wordpress welcome page of your primary site.

Adding second domain :
Previously we added A record and defined a primary domain, now we are going to add second site with domain name.
Now again go to your DNS hosting provider for second domain and create an A record using the same IP address for your second site.
Now after adding the A record got to wordpress dashboard, on top-left corner click on mysites > Network Admin > Sites >
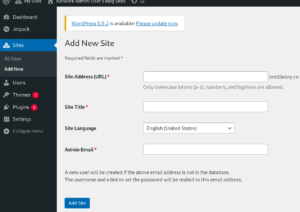
click on Add new,
- Add any name in the Site Address (URL) and ignore the suffix, this feild we are going to replace with our second domain after adding this site.
- Add any name in Site Title
- Add email
- Click Add site.
- Now go to sites again, and click edit under the second domain, now add your second domain name.
- That’s it, we configured both different domains but still we have something left. Eventhough we configured the second site we cant login into it as you get cookies not supported error when tryiong to login into second domain dashboard.
Resolving Cookies are blocked or not supported by your browser error :
- To resolve this error, go to your lightsail server terminal, in the path /opt/bitnami/wordpress/
- edit the file wp-config.php with your favourite editor
- add the below code somewhere in the file
if ( !defined(‘COOKIE_DOMAIN’) )
define(‘COOKIE_DOMAIN’, false);
Now we can login into both the dashboards of primary site and subsite with two diffeent top-level domains ( Note here we didnt used any plugins. )