This blog explains about how we can implement round robin deployment methos using nginx in AWS amazon.
What is Round Robin method ?
Client requests are routed asynchronously to available servers using this approach. Round robin method is effective when servers have almost equivalent computation and storage capacities.
What we going to do here :
- Creating image of our existing ec2 instance which has our application up and running
- Routing the traffic using nginx.
Creating Image of the existing instance
First thing we have to create an image of our existing instance where our app is running, so for that,
- Go to your AWS account EC2 console where your instance is running
- Right-click on the instance which your application is running and choose create image from the context menu.
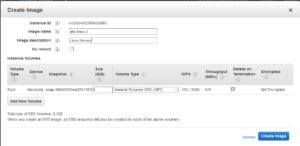
- After you will be redirected to a page like below shown, here give a name for your image, give description for the image and then for No Reboot section, basically if we dont select No reboot option EC2 shuts down the server and takes snapshots of any attached volumes and then reboots the server, but if your select No reboot option the server wont get shutdown while creating image.
- Go to your EC2 console
- search for AMI’s on the left navigation bar and click on it.
- Select owned by me on top left in console.
![]()
- Now select your instance and choose launch
- Choose volumes and the volumes must be equal to existing instance or more but not less than that.
- Add custom Tags
- Configure security group
- Next, Select an existing key pair or create a new key pair, select the acknowledge agreement box, and then choose Launch Instances.
- Now go to EC2 console and check instance status.
After few moments our instance will be up and running.
Configuring nginx to route the traffic
Now we have created and launched an image of our instance, and make sure that both the instance running your application in some ports. Now go to your main server which has nginx is running.
- Edit your nginx conf of your app located in the path etc/nginx/conf.d
- At the begining of the conf file add the below code
http {
    upstream myapp {
        server app1.yourdomain.com weight=5;
        server app2.yourdomain.com;
    }
}- Here myapp is the server group and inside the server group we adding the servers domain where your app is running.
- the
weight=5;is limiting the number of requests the sever should get and after the limit exceeds the requests will be redirected to the second server. - We can use more than 2 servers to serve your website and reduces downtime if your website has more traffic.
- To pass requests to a server group, the name of the group is specified in the proxy_pass directive.
- NGINX passes all requests to the backend upstream group defined in the previous example like shown below
server {
    location / {
        proxy_pass http://myapp;
    }
}
Now we have configured the basic configuration for round robin medthod using nginx.
Additionally, we can use ip_hash; in the server group as shown below, to make the requests from same address will be directed to same server unless the server is down,
upstream backend {
    ip_hash;
    server server1.yourdomain.com weight=5;
    server server2.yourdomain.com;
}
For example, if a person was directed to first site at first time, and the next time when he visits his requests always redirects to the first site only unless it is down, if the first site is down then it will redirect the request to second server.